Showing posts with label hand-dyed fabric. Show all posts

Thursday, September 22, 2022

ALL TOGETHER

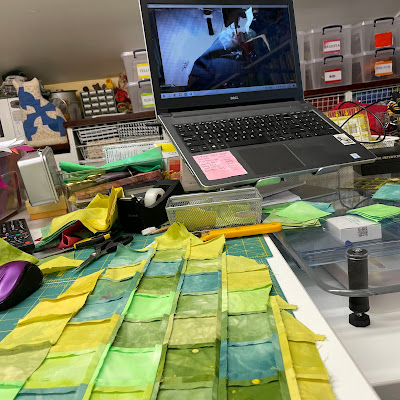
 I've finally gotten the top of the grid all sewn together.  The last few seams required a lot of adjusting.

Now comes the part where I need to square it up.  I started with the top and then squared down one side.  I put it up on the wall - my only flat spot large enough - and realized there needs to be more adjusting.  I pushed it around until I found a spot that needs to be tightened up and pinned it.  Then I gave up right before lunch time.  I'm tired.


Wednesday, September 21, 2022

SLOW GOING

 It seems these last few seams are really going slowly.  I've worked myself into a corner and it's a big puzzle trying to figure it all out.

I've finally got all of the pieces cut out.  Now I'm just trying to engineer how it put it all together.

There will be partial seams.


Monday, September 19, 2022

BP MONDAY SEWING

I continued to work on my Field of Jeans project from the weekend while visiting with my Brave Patch friends on our weekly get-together.

Here is where it ended up.  I still have a bit to do.  It seems to get more and more complicated as I go.  But I figured out that if I put up the pieces, as a road map, it makes it a bit easier.  I am ending up with some partial seams though.


I'm auditioning a bit of that bright red I rejected yesterday.  At this point I like it and will probably leave it in.  What do you think?


Sunday, September 18, 2022

DAY TWO OF WORKSHOP

 We met back together for the second day of Sherri Lynn Wood's zoom workshop, Field of Jeans.

Today we continued to work on our projects.  Sherri Lynn was there to answer questions and show some of her techniques for solving problems.

I woke up with a solution to why I was not happy with mine from yesterday.  I don't like the light blue 'sashing'.  I tried out some red over the light blue.


But, I decide that red was too bright, so swapped it for a darker red:  

I love it!

Then, I added some blue sashing.  I was worried I might be getting too many different colors, but so far, so good:


Saturday, September 17, 2022

FIELD OF JEANS WORKSHOP

 I took Sherri Lynn Wood's two-day workshop, Field of Jeans over the weekend.  I hesitated at first, because I didn't want to make a denim quilt, but I finally signed up because I could do the workshop without denim, using just regular quilting cottons.  

She had a guest speaker, Robin Green.  She had some great ideas and showed us her wonderful quilts.


One of the things she said I had to write down.  She said, "Think of your inner voice as a guide instead of a critic".  

I wanted to use some of my hand-dyed fabrics I've collected in this project.  I started with a big piece made by Laura Wasilowski and added in a few made by Judy Robertson.

Here's where I ended up at the end of the first day of the workshop and the After Sew.  Figuring out how to sew it together is challenging.  

I'm not happy with it.  Something needs to change.


Saturday, January 22, 2022

JOE AND RED

 Today was this month's Joe Cunningham's Quilt Freedom Workshop.  The topic was 'Red'.

He had a San Francisco artist, Amy Trachtenberg,  as a speaker, along with Carolyn Ducey from The International Quilt Museum and Julie Silber, quilt collector.  They each talked about the color red and how it affected the composition of the artwork and quilts we were viewing.  It was very interesting.

I was listening and watching, but I was also working on a chunk of background for the Big Flower quilt, Amity Baroque.


It's looking like I will not have enough of these fabrics to finish the quilt.  Eek, I have to dye fabrics to match now.  Good grief.

Thursday, January 13, 2022

GREAT LEAF!

 I got frustrated the other day while making the spikey parts that go around the leaf.  They were difficult to make and i was having a hard time.

So, I put off finishing the first half and went off to do something else.  I was sorting my fabrics and bagging up stuff I don't want anymore.

I came up with a slightly different method to make them and yesterday I finished the first half of the spikey parts and it looked great!  So, I finished the second half today and sewed them all together and even added some of the background.


Wednesday, January 05, 2022

BACKGROUND SQUARES

 Taking the advice I received at yesterday's meeting with Irene Roderick's workshop group, I cut some of my hand-dyed fabrics into 2-1/2" squares and put them up to see how it looked.

I'm not thrilled, but it is heading in the right direction.  

I need to make more of that light yellow-green fabric that's around the spikey parts to make the transition between the different fabrics less stark.


Thursday, March 14, 2013

MAKING LITTLE FOUR PATCHES

I started on my new quilt project using my dyed fabrics.

First thing was to make some four-patches.

I did it the easy way.  I got out a sharp pencil and figured out how many of each color combo I needed.  I cut a bunch of strips from the different fabrics, joined them together according to plan and then chain pieced them.  Easy-peasey.


Step One - sewing strips together.

Step Two -Join two of the strips right-sides-together and then cut them cross-ways.

Step Three - Chain those together.


Step Four - Iron open and voila!

107 Four Patches


Thursday, March 31, 2011

HANDMADE LABEL

Using my lightbox, I inked the label, onto a piece of the lightest hand-dyed fabric, using Prismacolor Pigma pens.  


Wednesday, March 30, 2011

THREE QUARTERS OF A BACK


No this is not about football.

The bottom half is done.

Today I got the left side of the top done.

It gets difficult to handle when it gets this big.  But...the bigger it gets the sooner it's done.

Wednesday, September 15, 2010

FUN WITH FLOWERS

I had an irresistible desire to find out what fabric dyed from the petunias at work would look like.  So, I couldn't help myself and picked some last weekend and put them in the freezer.  These petunias are everywhere, there are plenty of them and I only picked a few from each plant and picked them from the backside, so no one would notice!
I was intrigued because of the color.  The only way I can describe it is FUSHCIA pink:


According to Eco Colour: Botanical Dyes for Beautiful Textiles  by India Flint freezing the delicate flowers causes the individual cells holding the dye to rupture, so not much heat is needed to release the dye.

I was surprised when I brought the flowers out of the freezer they had changed color to a deep purple.  In fact, when I started stuffing the frozen petals into a nylon sock they were already releasing the dye all over my hands and the countertops!


I put the sock of flowers into a pot of hot warm (from the tap) and heated it.   After squeezing all the liquid from the petals in the sock, I divided the liquid into four glass quart jars.  I left one of them 'plain', one of them I added a little alum to, one of them I added a little copper sulphate and the last one I dropped some rusty pieces of steel, which would be akin to adding iron.  Then I put a fat quarter of cotton, which had been prepped with an alum mordant,  into each one:


Instantly you could see the color differences.  The plain is, well..., plain.  The copper has a decidedly blue-tint.  The alum leans more to the red, and the one with the iron is definitely blacker.
At this point, I realized that I had made a big mistake by heating the flowers too much.  And, I probably added too much water to the dye pot.  These mistakes resulted in a very poor showing of the fabulous color I was seeing from the iced-flowers.  The next day I took the fabrics out of their baths and let them oxidate for about an hour and then put them back in.  I will leave them for another day or two, but I don't think that they will improve or get darker.
  

Pretty sad looking at this point.  But, I have really learned a lot.  And, after all, that's what this is all about!  I think next week I'm going to gather some more of the same flowers and try again.  This time without the heat, and less water.  

(I went out into our garden and picked all the petals off some of our flowers.  We don't have a lot, but I picked all the blooms off of our purple petunia, one red geranium, and one small yellow plant.  They are in the freezer, I'll be putting them in the dye pot tomorrow! My husband was stupefied as to why I decimated the flowers!  Hey, it's raining, they'd be gone soon anyway.)

Tuesday, September 14, 2010

RUST CONTINUED

I quilted the Rust Experiment today.  I wanted to just quilt around the 'rust' circles made by the metal disks.  But I don't think I've ever quilted or sewn 'perfect' circles.  I've seen a device that attaches to your machine that holds the fabric in place for sewing perfect circles.  Since I don't have one, and don't even know where to get one, I came up with a simple solution - a pin inserted through the center of the circle into my sewing machine's table.  Good thing it's wood - huh?

After I got the initial circles quilted around each of the rust circles I felt it needed more quilting.  So, I did the easiest thing and just echo-quilted around the circles.


Usually, I put binding around the outside to finish a quilt.  But the colors on the outside of this piece of fabric I used as the background is very interesting!  It has picked up stray dyes somewhere, making these interesting changes from blue to green to yellow.  I'm not sure how I'll finish it now.

Friday, September 03, 2010

RUST EXPERIMENT

Being bored, I started cutting out rectangles from the group of fabrics I recently sun-dyed.  (A great group of fabrics, I really like the colors - and more than that - I love the fabric.  I need to find a source for it.)
I arranged the rectangles on a piece of fabric I had made in the recent workshop at Pratt.  It was one I made, with sad results, using a paper litho-plate technique.  It works well as a background.

I've taken numerous design classes and workshops.  I want there to be a 'formula', you know?  But, I'm realizing, there just isn't.  I can't say what makes a design work, for the most part.  But I can 'feel' when it does.  I just moved the squares around and around, until they 'felt' right.  I would take them off, and put them back and realized there are endless possibilities that work just as well as the next.  Hmmmm.


After I was tired of this game, I stopped at the latest arrangement.  Then I stitched around them to secure them to the background.

Then I dampened it and arranged some metal discs on it.  I wanted rusty circles!  It took two days until I was tired of watching it rust.  I had to re-wet under the discs the next day.  I removed the aggressive rusters and moved some of them to the lazy ones positions.


Here it is now.  I think I want to quilt around the rust circles.