I ran across these blocks a few months back. And, they've been sitting out where I can see them and think about them. I love blocks with lots of triangles, and I love tree blocks.
 |
| A block with my signature and date |
My first thoughts when I put them up on the wall was, "what was I thinking with that horrid background fabric?" It was tan, but it was very cold and I hated it. It definitely needed something.
 |
| Blocks on the work wall |
I thought about adding some more blocks...there are only 28 10" blocks. Not a very big quilt.
Then, I started looking through my stash and came up with a perfect Jinny Beyer border fabric in black and dark brown, with a little tan. And, lo, I had a lot of it!
I cut out some of the strips and put them between the rows. What a difference that made. The blocks began to look good!
I had put them in this configuration right off. I liked it and so I never tried any other settings.
Next I cut out and stuck this border up on the wall with it.
I was thinking I wouldn't have enough of the border to make mitered corners. But, it looked so good I just forged ahead - I'd think about the miters later, it might be really close.
I started sewing the blocks together in the rows. I hadn't bothered to measure any of them, but I noticed that one of them was definitely smaller. I measured it, it was a good half inch smaller, both directions, than the others. So, it got set aside (it's now on the back) and I made another block out of fabrics I had. Luckily, there was a whole yard of the background fabric in the bag with the blocks. I guess I was thinking I was going to make a lot more blocks. You might notice the block in the bottom row, far right, is the one that gets replaced with the new block, which I signed, with my new married name, and dated 2012.
I came across another one that was too small! I didn't want to stop my momentum and go back and make another block - so I just added a half inch border of background fabric all around it. It's different, but it's still involved. (Most of quilt-making is about problem solving, isn't it?)
After I got the rows of blocks sewn together, I marked the back of the sashing in 10" increments, so I could line up each block. If you don't do this sometimes things will go awry and the blocks won't be straight across from each other going the other direction. Situations like this are the rare times I actually use pins to hold things together as I sew.
It went together like a breeze.
Then I had to think about the outside border.
I measured and remeasured. I definitely did not have enough for mitered corners. Dang! It was only short by a few inches, too. I love mitered corners with a border stripe fabric.
I thought about trying to make up something that looked like mitered corner, but the other strip I had leftover, was going in the opposite direction from the ones I was using. I thought, what the heck, I'm going to make it work anyway, until I realized it was narrower, too. I just did not have enough fabric to make it work.
So, in my frustration, I made these horrid corner blocks, which I now hate, but am going to use anyway, because I'm tired and frustrated. And what was I thinking making bias squares - on the corners. Not smart! But, I'm moving on. Here's the top, like it or not. (I'm going to ignore the corners.)
P.S. I like it!
 |
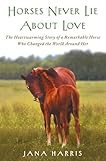
| The top on the wall |
I was going to move on to something else, but I realized it's still a UFO at this stage. I must finish it! So I whipped up a back using some tan fabrics from my stash that I knew I'd probably never use. It worked out that there were a few with enough yardage, so I didn't have too much to piece together. I even used up the majority of the leftover background fabric - which I inked a label onto. Plus I included the address to this blog post. Hopefully, this story about the quilt will be here for a long time, I have this dream of someone getting the quilt, years and years from now, and coming to my blog to learn about it and me. If you do, please leave a comment!
 |
| The label with the address to this post - weird, huh? |
I cleaned the studio floor and pinned the quilt on Friday, all before lunch. Usually, as I'm pinning it, I think about how I want to quilt it. I just want to do something quick and easy, but complimentary. I started thinking I needed not only tan thread, but probably a dark thread for the sashings and borders. Hmmm, I have lots of black thread. But, that would be too harsh. I needed dark brown thread. That was a great excuse to go to the new quilt store in the Admiral district, West Seattle Fabric Company. So, we went for lunch in that direction, and I ran in for two spools of dark brown thread (that is the only thing I bought new for this quilt [$6.37], everything else I had on-hand. Well, except for the batting. I had bought a case of bats last year, just so I could finish some old projects).
 |
| Back stretched out on the floor |
 |
Batting added, then the top is smoothed out.
Ready to pin |
I got it pinned up after lunch, that was definitely enough for one day. But it was ready to go and waiting on my work table for me.
 |
| Pinned and ready to quilt |
The next day I got a lot of the quilting done. Probably more than I should have done in one day. But I finished it up Sunday morning, after our usual breakfast at Luna Park Cafe followed by the weekly grocery shopping.
 |
| Just simple out-line quilting |
Darrell was cleaning up his office and wanted to do some work on it before we did anything else, so that was my chance to work on this, too. He took more time than he said, so I whipped up a binding for it also. I had thought a dark brown or black binding is what it was going to want, but it ended up being a lighter brown, like the light parts of the border. Which is good, because I didn't have any large enough pieces of darker fabrics. I only had a few of the right color browns I could pick from, so I guess I'm lucky I had something that would work - or it would have been back to the store, and we didn't want to do that, now did we?
 |
| Quilting on the corner, seen from the back |
I knew the choice of dark brown thread for the quilting would show up on the tan backing, but I kinda liked that idea. And it does look interesting, even though any errors are shown in glaring detail. I quilted the whole thing using the walking foot because it's easier on the shoulders and neck, but I kept thinking it would look really cool if I quilted around the 'scallops' on the outside border. Cool, but a lot of work. I tried it on the corners with the walking foot. It actually turned out pretty nice. But, I put the binding on...and we'll just have to wait to see if I ever go back and quilt around that scallop.