Showing posts with label parchment paper. Show all posts

Friday, August 06, 2010

CONNECTING ART TO STITCH LESSON #1


 I found a very interesting book the other day, Connecting Art to Stitch by Sandra Meech.  I've read the first few chapters and decided to start doing some of the exercises in the book.  It's purpose is to show/teach you how to take your artwork and interpret it in fabric/sewing.  
This first lesson was about doing a simple scene in shades of gray.  I looked through my file of still life photos and came up with an old one I've always liked.  It shows an ashtray on a table with a chair, looking down from above.  I converted it to black and white in Photohop, and used a filter to simplify it.
Having read the chapter a few days before, I went out to the studio in the morning and started painting paper with acrylic paints in seven shades of gray going from white to almost black.  That in itself was quite a learning experience.  It took me a lot longer than I thought and I really enjoyed doing it because of all the things I learned.  I was really impressed with the results, too!
But, I didn't think it all the way through, and I didn't do it the way the book suggested with tracing paper and charcoal.  I just used the regular paper I would use when painting with acrylics - I should have used thinner paper.  This paper is too thick for this project, but it takes the paint well!
I used a tracing paper overlay to aid in alignment, and cut the pieces out with an exacto-knife.  The white edges of the paper show, particularly on the darker ones.  I was very disappointed at first, but since it's consistent throughout, I think it looks okay.

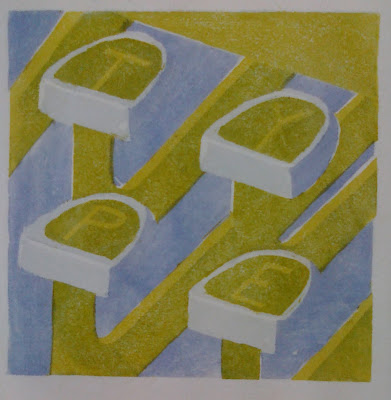
This is 'Ashtray' in cut painted paper, approximately 8" by 10".


I really want to do this in fabric now!  


Thursday, January 14, 2010

EXCHANGE 43 RE-DO

I struggled with the decision to add more ink to the 'keys'. I had put one coat of blue over the yellow, which created the letters. But after it dried, it was lighter than I wanted and the letters didn't show very well. I eventually came to the realization that it's the letters that matter most! So, I had to try. I was concerned because I was going to have to have perfect registration to line up with the letters that were already there. And we all know how I struggle with registration.

I was so thrilled when I pulled the first print and it had lined up great and the letters just popped out. What a relief! It really did look alot better now, too.

But, I couldn't relax because each and every print had to be lined up perfectly. It's not easy because the print goes face down onto the plate. You don't know what you'll get till it's all over and you pull the paper up. That's why printmaking is such a thrill! It's exciting every time you pull a good print. I think it's also addicting, that thrill of achievement.

I still have one more color, a dark blue, before I can relax and say they are done.

I didn't have the traditional type of paper used to cover the back of the print when rubbing with the baren. I thought I'd use wax paper, but I didn't have any. I did have some parchment paper in the kitchen. So, I tried that. It worked better than anything else I've tried.

I've got to remember the things I've learned this time!


I'm going to set this project aside until next Monday. See you then!